

During the past several years, editing images on an iPhone has become more simpler, and each new version of iOS improves the options available. Apple Photos is on our list of the greatest picture editing applications for a reason.
This secret approach simplifies iPhone photo editing.
However, things might get quite time-consuming if you need to alter a large number of photographs. Thankfully, your iPhone includes a secret capability that allows you to simultaneously edit numerous photographs.
This function does not allow you to trim or apply filters, but this instruction will be useful if you need to tweak the orientation, remove the backdrop, or change the file type. Here’s how to simultaneously edit numerous iPhone images.
How to edit several iPhone images simultaneously
- Launch Apple Photos and choose the images for editing.
- Share and store these photographs in a new Files folder.
- Open files and choose the photographs you wish to alter.
- Choose your editing choice by pressing the three-dot menu in the lower-right corner
1. Select the photos you want to edit in Apple Photos

The first thing you want to do is head into the Apple Photos app and select all the images you want to edit. Do this by tapping the Select option in the top right, and tapping each relevant image thumbnail.
2. Save those images to the Files app

Those images now need to be transferred to the iPhone’s Files app. With your images selected, tap the Share icon in the bottom left, followed by Save to Files.
3. Create a new folder in Files

Before you can actually finish the save, you’ll need to create a new folder. Tap the three dot top menu in the top right corer and select New Folder You’ll then be prompted to name this folder, and doing so will automatically open it. Hit Save in the top right to complete the step.
4. Select the images in the Files app

In a near repeat of step 1, you’re now going to need to select these images in the Files app. Navigate to the folder you just created and hit the three dot menu on the top right followed by select. Then select the images you want to edit.
5. Edit the images
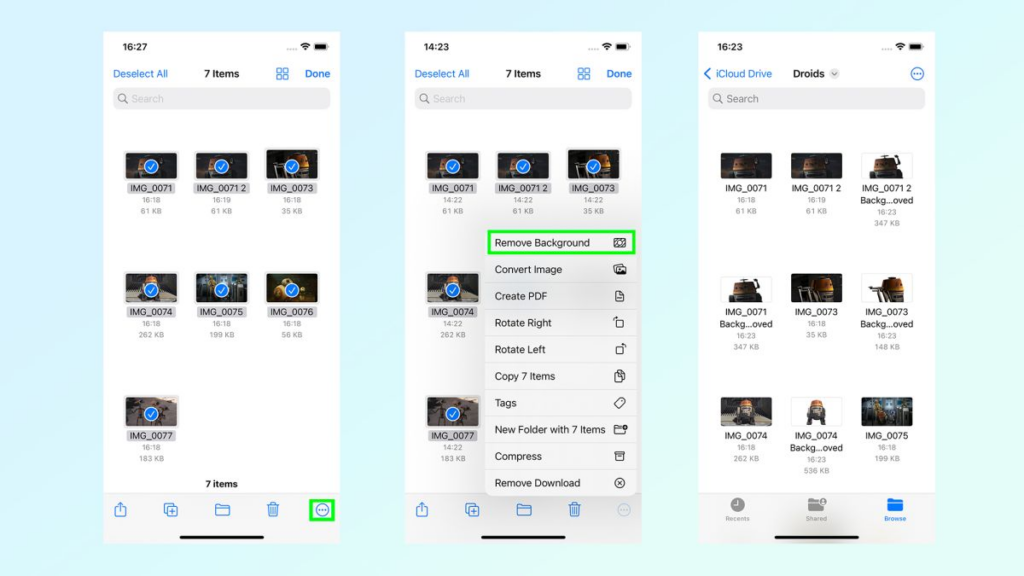
Now that your photographs are selected, click the menu with three dots in the bottom right corner. From there, you select the desired editing option, which in our instance was background removal.
In addition, the picture may be rotated to the left or right, added to a new PDF, or converted to JPEG, PNG, or HEIF format.